

Creating A Cyberpunk Scene In Blender Step-By-Step

Creating A Cyberpunk Scene In Blender Step-By-Step
Published 6/2025
MP4 | Video: h264, 1920x1080 | Audio: AAC, 44.1 KHz
Language: English | Size: 5.36 GB | Duration: 3h 50m
Published 6/2025
MP4 | Video: h264, 1920x1080 | Audio: AAC, 44.1 KHz
Language: English | Size: 5.36 GB | Duration: 3h 50m
In the first part, we start from Blender's default cube and turn it into a detailed coffee bar, using only one reference
What you'll learn
I will introduce you to Blender (free software)
I will introduce you to modeling and texturing
I'll show you how to achieve realistic results quickly
We will create a scene from the introduction in Blender
Requirements
Free software Blender. No previous experience is necessary.
Description
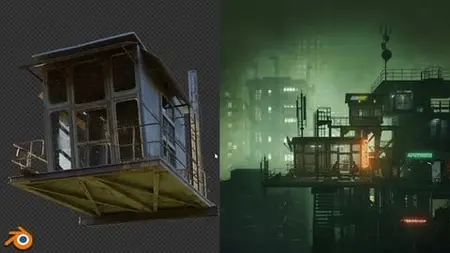
Hello and welcome to a new tutorial in which we create this cyberpunkish scene in Blender step-by-step.The tutorial lasts about 4 hours in total, divided into 25 chapters with an average duration of about 10 minutes, to make it as easy to follow as possible. In the first part, we start from Blender's default cube and turn it into a detailed coffee bar, using only one reference image plus an additional concrete texture for imperfections.This is an ideal practice if you want to learn modeling, texturing, and UV projection in Blender because we go through more or less all the tools and the whole process is recorded in real time, so the tutorial is also suitable for beginners.After we finish our coffee bar, we continue with the scene creation. In this part, we use other assets that I created earlier and talk about the camera, lighting, post-processing, and more.The tutorial is step-by-step and suitable for beginners as well.I recorded the entire process of modeling and texturing the container house as well as the creation of the entire scene in real time. All resources and links are included in the tutorialThe first part of the tutorial is free!
Overview
Section 1: Introduction
Lecture 1 Introduction
Lecture 2 Container house, base shape
Lecture 3 UV and Windows
Lecture 4 Finishing Windows
Lecture 5 Adding imperfections
Lecture 6 Fixing UV
Lecture 7 Rain canopy
Lecture 8 Side part
Lecture 9 Stairs
Lecture 10 Creating details
Lecture 11 Fence
Lecture 12 Texturing the fence
Lecture 13 Floor structure
Lecture 14 Creating more details
Lecture 15 Reflector and electrical box
Lecture 16 Cables and texture enhancement
Lecture 17 Dust shader
Lecture 18 Start creating a scene
Lecture 19 Lighting
Lecture 20 Importing Industrial decoration assets
Lecture 21 Neon signs
Lecture 22 Rendering
Lecture 23 Post-processing
Lecture 24 Post-processing part 2
Lecture 25 Post-processing part 3
Lecture 26 Finale
For blender beginners as well as more advanced users.